Commands
This document outlines the implementation of commands in Tuoni. From a broad perspective, there are two types of commands: native commands and plugin-based commands. We will begin our explanation with native commands as they represent the simpler category.
Native commands
Native commands in Tuoni are those implemented directly within the agent. They consistently operate within the agent's process and are primarily associated with managing the agent's configuration or handling tasks that are impractical to implement as plugins. A prime example is the "die" command. This command terminates the agent process and, under no circumstances, should it be associated with any external processes or functionalities.
Plugin based commands
In Tuoni, the majority of commands are implemented as plugin-based commands, which bear a significant resemblance in structure to the listener plugin. These commands are composed of two essential parts:
-
The C2 Plugin Part: This component is responsible for integrating with the Command and Control (C2) system. It manages the configuration of the implemented command(s), parses results, and handles other related tasks.
-
ExecUnit part: This is the executable code delivered to and run by the agent. The C2 plugin generates it and the agent executes it. See ExecUnit below for details on the supported formats.
ExecUnit
An ExecUnit is the packaged executable code that a command plugin produces for the agent to run. It contains the code bytes, a declared format, an optional entrypoint, and a plugin-specific configuration blob. The agent receives the ExecUnit, loads it according to its declared format, and executes it.
ExecUnit types
| Type | Description |
|---|---|
SHELLCODE_NATIVE |
Raw native shellcode, executed directly by jumping to the code bytes. |
DOTNET_EXE |
A .NET executable loaded and invoked entirely in memory via the CLR. |
DOTNET_DLL |
A .NET DLL loaded in memory; a specific method is called via reflection. |
NATIVE_LIB |
A native DLL loaded with a memory-mapping technique; a named export is called. |
Agent capability matching
Not every agent build supports all four ExecUnit types, and the available types may differ between self-process execution and injection into another process. The C2 resolves this automatically:
- The agent reports its supported and preferred ExecUnit types in its metadata, separately for self-process and remote-process execution.
- When a command is dispatched, the C2 intersects the command's supported types with the agent's capabilities for the chosen execution context.
- The agent's preferred ordering is respected; the first mutually supported type in that order is selected.
- If the payload configuration sets
execUnitTypeOrder, that order is reported by the agent as its self-process preference order. If a command request setsexecUnitType, the C2 validates it against both the command and the agent before accepting it. - If no compatible type exists, the command is rejected with an error.
IPC between agent and ExecUnit
After launching the ExecUnit, the agent needs to pass it the command configuration and later receive results. Two mechanisms are used:
- Named pipe (
NAMED_PIPE): The agent creates a Windows named pipe before launching the ExecUnit. The ExecUnit connects to this pipe, reads the configuration, runs the operation, and writes the result back. This is the standard mode for most commands. - No IPC (
NO_IPC): The ExecUnit receives its configuration encoded directly in the code or launch context and does not need a back-channel. Results may be captured via other means (e.g. stdout redirect).
How it works in practice
- Through the C2 API, the GUI or script selects a command for the agent and configures it.
- The command's name, agent GUID, and configuration are transmitted to the C2 via the C2 API.
-
The C2 forwards the configuration to the command's plugin, which then converts it into a format understandable by the ExecUnit. The plugin returns this configuration along with the ExecUnit itself to the C2.
-
The C2 dispatches all this information to the agent through the listener plugin connection.
- The agent's core loads the received ExecUnit in itself or another process (as configured) and establishes an IPC channel to it (typically using named pipes).
- The agent's core sends the command's configuration to the ExecUnit via this channel and waits for the outcome.
- The ExecUnit executes its designated function and sends the result back to the agent's core.
- The agent's core then transmits these results back to the C2.
- The C2 utilizes the command plugin to interpret the result. The plugin provides the parsed result to the C2 in a specified format (which could be a file, a string, etc.).
- The command's results are now accessible through the C2 API.
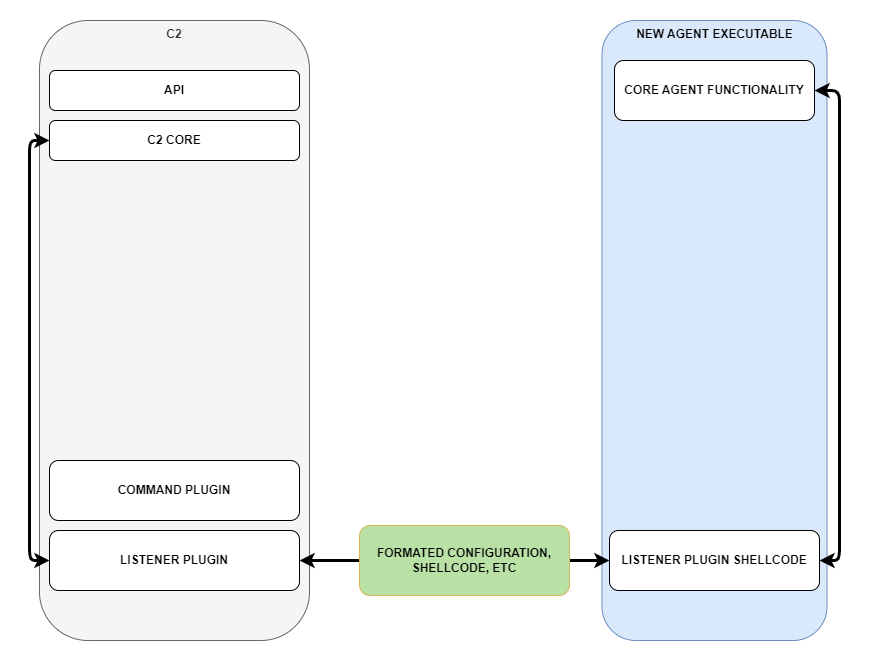
Visual representation
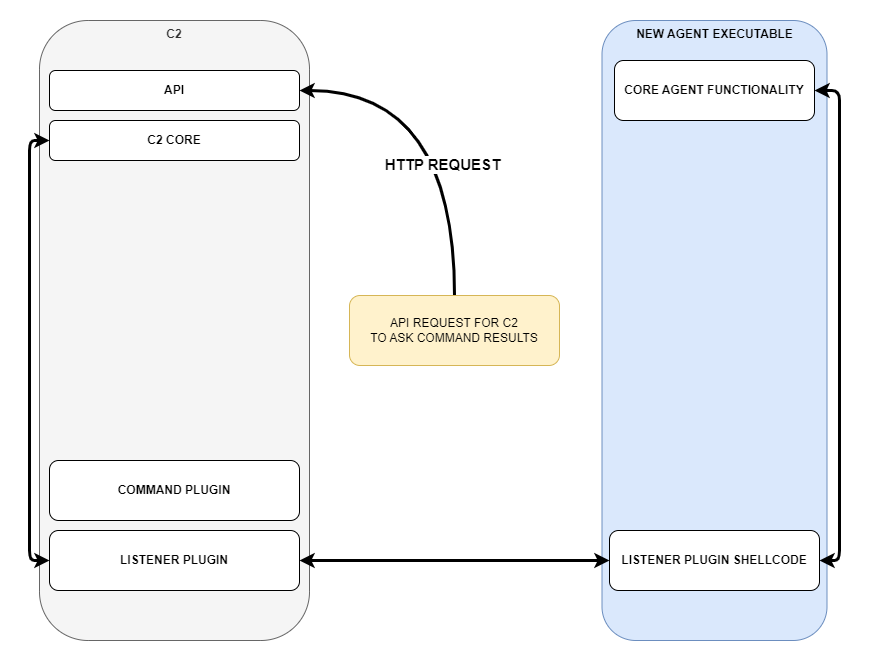
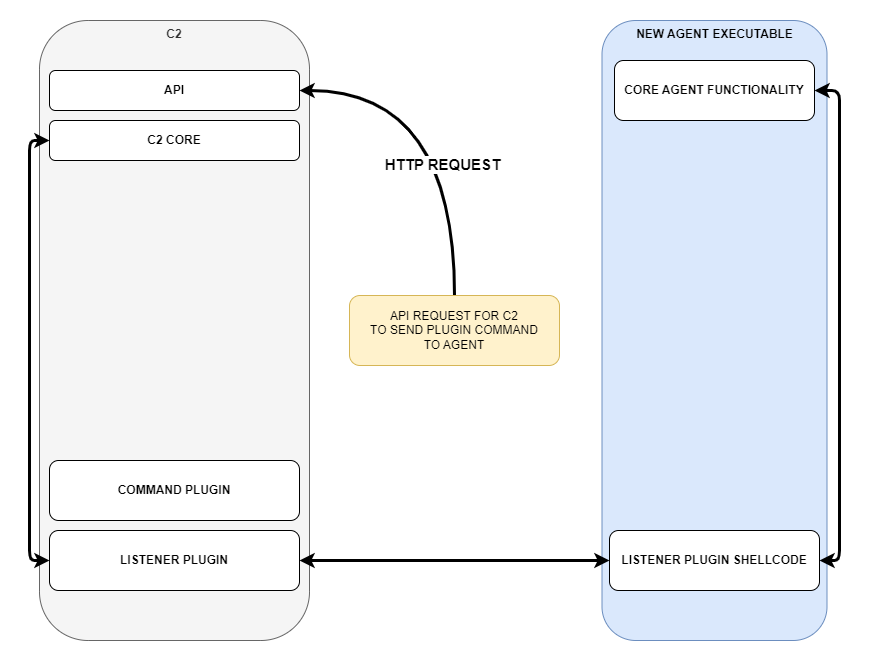
Step 1
User tasks C2 to send command to the agent via C2 API. This can be done with GUI or script. User provides command configuration.
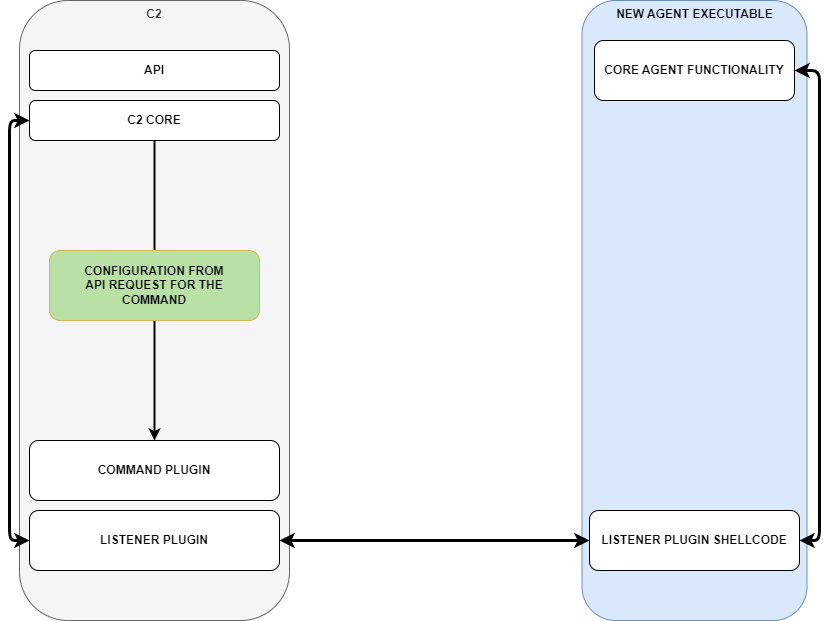
Step 2
C2 gives command configuration received via API to command plugin.
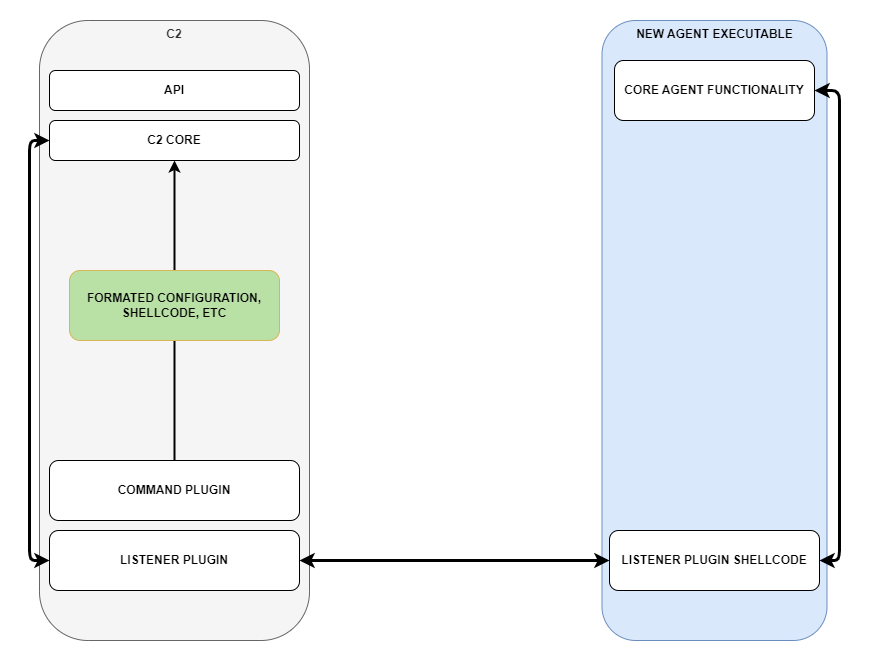
Step 3
Command plugin parses the provided configuration and gives C2 back the ExecUnit plus the configuration that should be relayed to it upon execution
Step 4
ExecUnit and configuration are sent to the agent
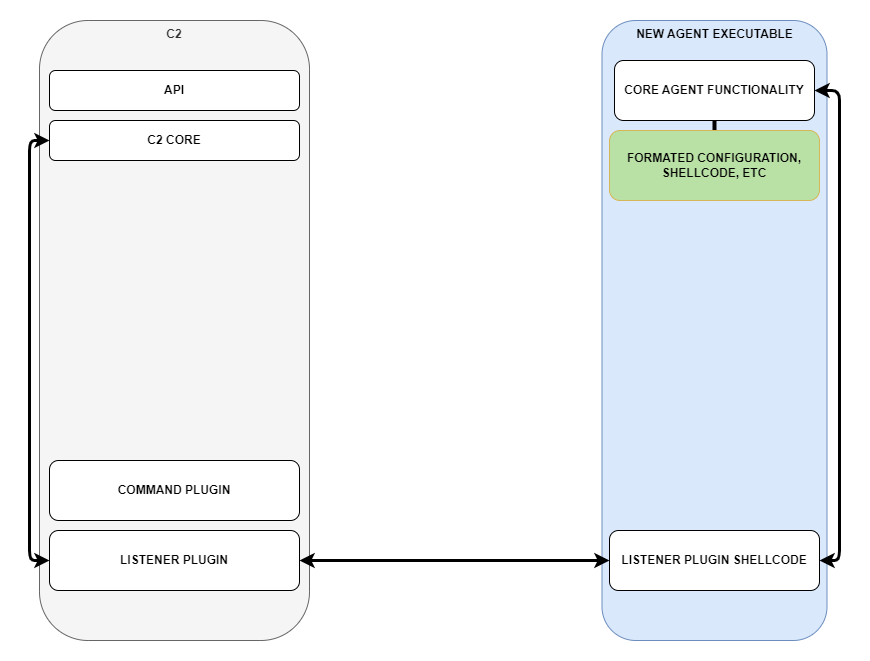
Step 5
Agent core parses the information sent to it and separates executable code, ExecUnit metadata, IPC configuration, and command configuration
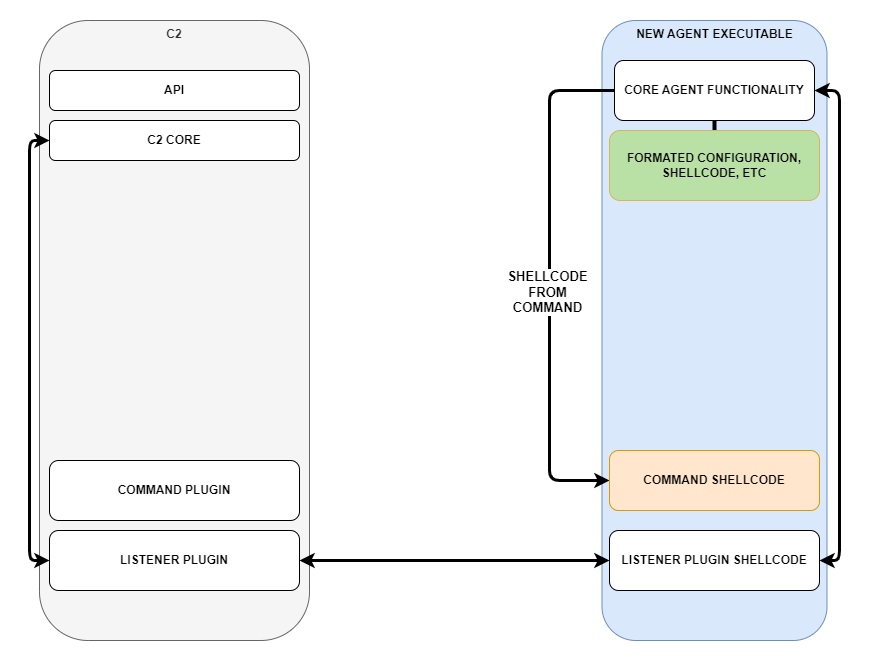
Step 6
Agent core executes the provided ExecUnit in the configured execution context
Step 7
Agent core and executed code create a data channel (usually named pipes) and agent core relays the configuration
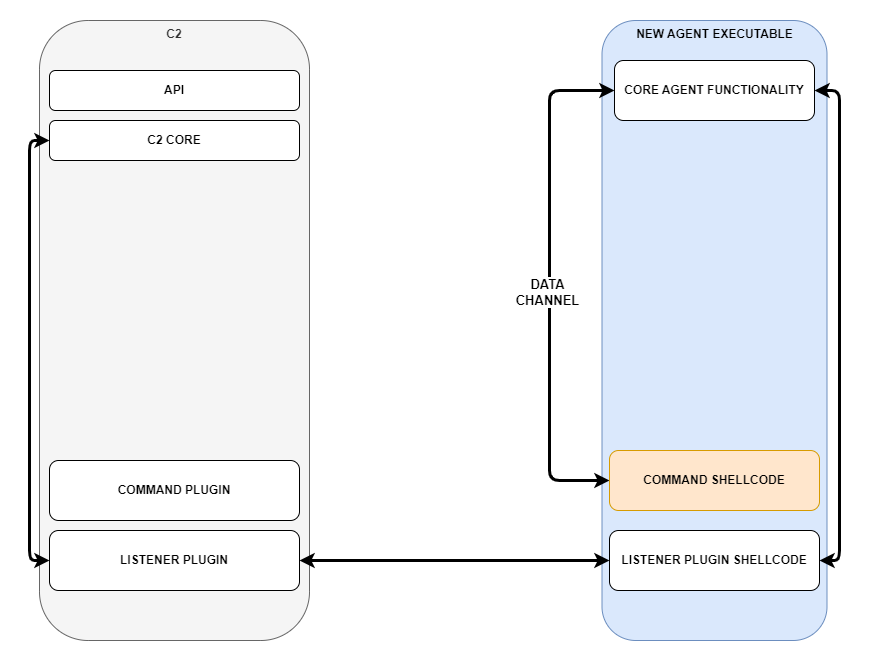
Step 8
Executed command code returns command results to the agent core
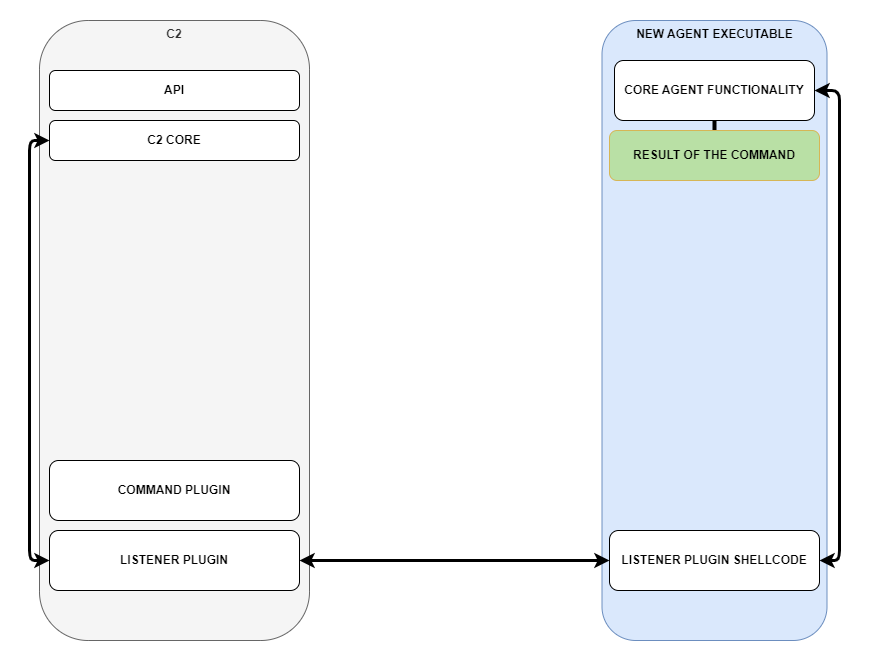
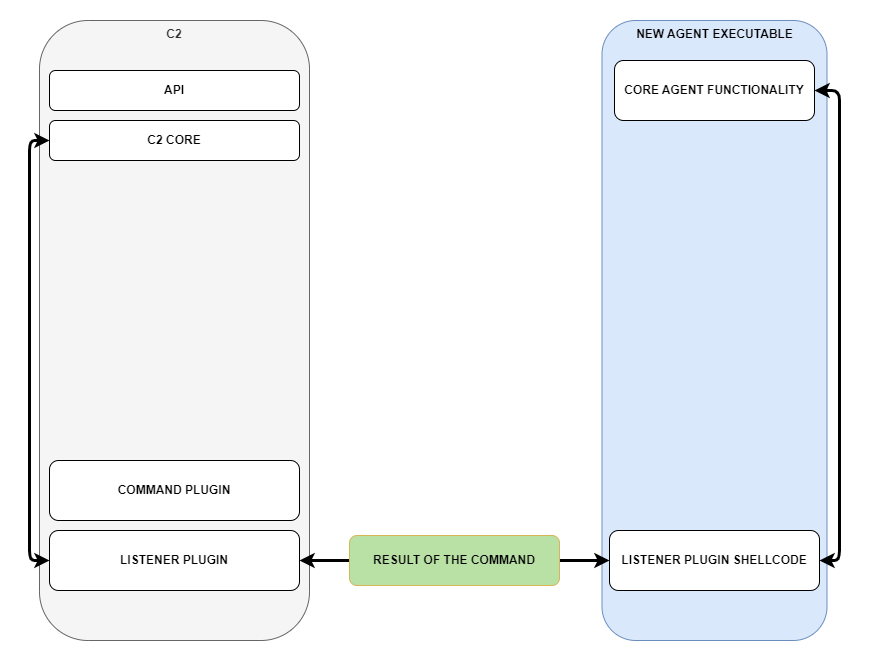
Step 9
Result is sent to the C2
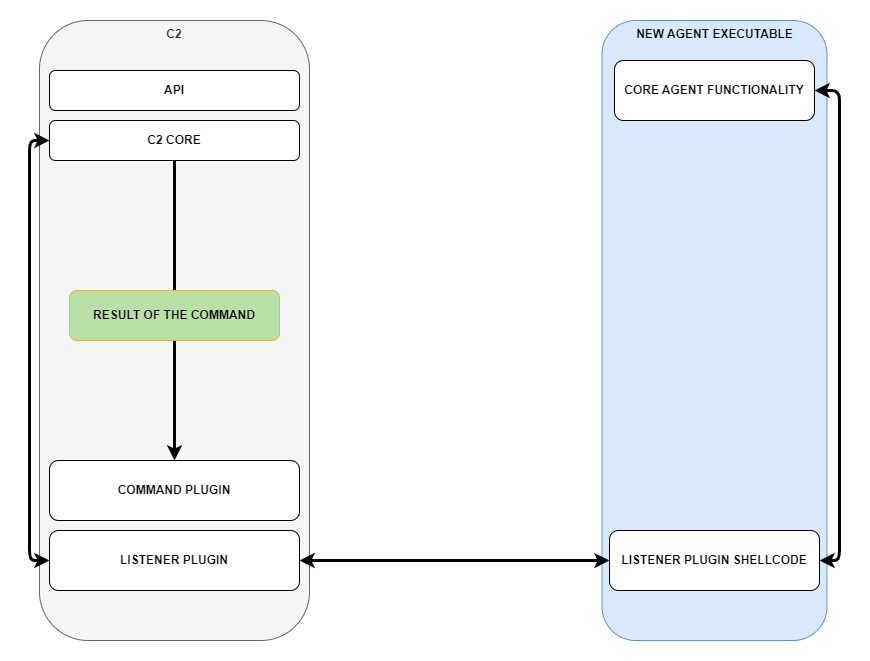
Step 10
C2 core provides result to command plugin to parse
Step 11
Command plugin gives C2 core the parsed result
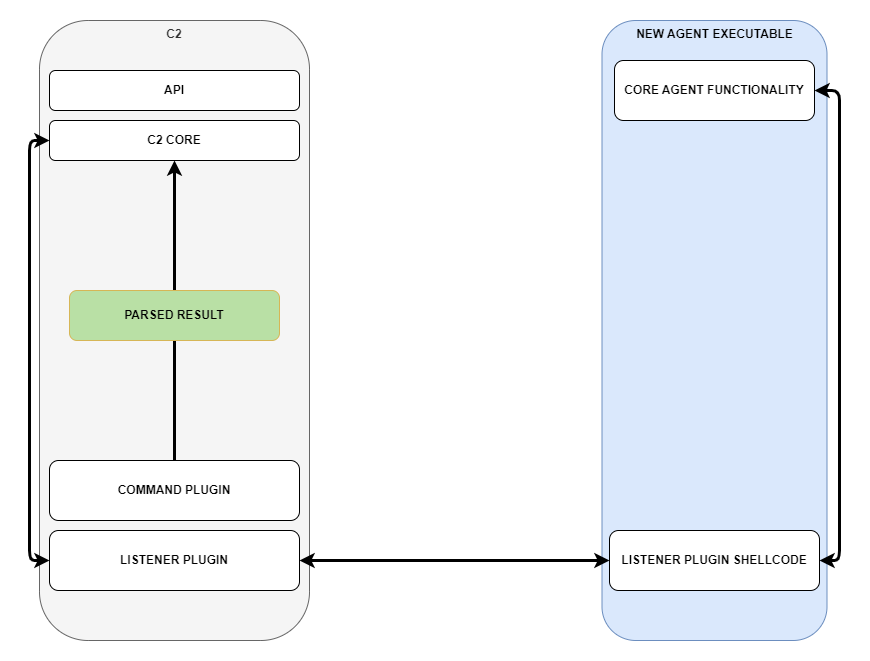
Step 12
User can now ask for command results from the C2 via API